Turnkey OpenLDAP

Tags

For this exercise, we’ll be setting up an OpenLDAP server (and at least one ldap client VM on Ubuntu desktop) using virtualbox.

Resources:
* Turnkey OpenLDAP VM = https://www.turnkeylinux.org/openldap
* Ubuntu desktop ISO = http://www.ubuntu.com/download/desktop

Sometimes it is important to configure an OpenLDAP server (and x clients). If you are just learning, or looking to get one setup quickly then using the turnkey VM might be the way to go.

Once you download the Turnkey OpenLDAP VM’s OVA file, you can double click the file to “import into Virtualbox”.  Once you have imported it, and started the VM, you will be required to enter the following:

  • Provide a new ROOT password
  • Provide password for the openldap ADMIN account
  • create a new domain (i’ll use example.com for this)
  • APPLY to start using services immediately
  • Local system notifications (optional)
  • Install system updates automatically (recommended usually)
  • Networking (dhcp by default, but you can swap to a Static IP via using the networking menu to change)

Typically one would also install tcpdump here as well, so you can examine the packets when doing ldap(s) authentication.  However, this depends if you have networking configured to be internet accessible or not.

Note:  This configuration will work out of the gate using plain-text ldap (port 389).  The configuration should be done this way first, to ensure everything is working PRIOR to swapping it over to ldaps.

LDAP Client Installation

Ubuntu 14.04 LDAP Client Installation

Once base system installed, do the following:

  • sudo apt-get update && sudo apt-get upgrade
  • edit the /etc/hosts file… add an entry for the IP address and FQDN for the openldap server.  (example:   192.168.5.95 example.com)
  • sudo apt-get install ldap-utils nscd tcpdump ldap-auth-config openssh-server  ## Refer to ldap-auth-config section for settings ##
  • edit /etc/pam.d/common-session and add this entry:
    • session required pam_mkhomedir.so skel=/etc/skel umask=0022

NOTE:  Recommend running a “save snapshot” on the client VM here before doing next step.  Just in case the nss bug comes into play.

next edit /etc/nsswitch.conf and update the 3 lines like so:

passwd: compat ldap
group: compat ldap
shadow: compat ldap

(You should just be adding LDAP for those 3 lines… ensure the word ldap is appended “after” compat. If you prepend it, the nss bug will most likely come into play and the next reboot will be affected.

ldap-auth-config

After installing ldap-auth-config, you will be presented some questions… Here are the answers for “example.com” domain.

  • ldap server = ldap://example.com # will change to ldaps later
  • DN of the search base = dc=example,dc=com
  • ldap version to use = 3
  • Make local root Database admin = yes
  • Does the LDAP database required login = no
  • LDAP account for root: cn=admin,dc=example,dc=com
  • LDAP root account password  (password set when turnkey OpenLDAP server above was installed for admin LDAP account)

Once this is done, restart nscd with: sudo service nscd restart. Next, confirm connectivity with:

ldapsearch -x -b 'dc=example,dc=com' -D'cn=admin,dc=example,dc=com' -H ldap://example.com -W

LDAP Configuration:

Connect to the website via:

https://example.com

or http://example.com (if not using openssl)

Login with your ldap admin account, and do the following to create a “sample test user”.

  • expand users, and create a child object.. as a “generix posix user” and fill out the required sections (we’ll give it a uid of smithj)
  • modify the recently created user, and change the UID to a higher number (so you don’t interfere with existing users on a system)… 5000 would be good for example.

Test it out by…

Using another box, attempt to ssh into the Ubuntu 14.04 LDAP Client box’s IP just configured. For this example, let’s assume this IP = 192.168.5.50

ssh smithj@192.168.5.50

If everything works, you should be logged into the Ubuntu LDAP Client machine as user smithj.

Now that you’ve confirmed that ldap works, you can now reconfigure it to use ldaps with the following steps:

* sudo dpkg-reconfigure ldap-auth-config and change the ldap entry to: ldaps://example.com (take defaults for everything else)

* Next edit /etc/ldap/ldap.conf and set the following: (do this on clients & server)

BASE dc=example,dc=com
URI ldaps://example.com
port 636
ssl on
ssl start_tls
TLS_REQCERT allow

Now attempt another ssh connection to the ubuntu ldap client machine 192.168.5.50 and it should connect. To confirm it’s encrypted, you can run the following command on your OpenLDAP Turnkey box:

tcpdump -i eth0 -nvvXSs 1514 port 636

Substitute eth0 with the proper ethernet interface if it isn’t eth0.

CAA can’t add a clusternode

Tags

, , , ,

Recently when playing around with caa utilizing SSP (Shared Storage Pools) I can across an issue when attempting to add a node to an existing cluster. The exact errors when adding the node is:


cluster -addnode -clustername test -hostname testvm1.example.com

WARNING: Could not establish a socket connection to node testvm1.example.com.
The given request has been partially succeeded.

Check cluster status for issues with cluster services for the added node.
testvm1.example.com

After doing some playing around with contacting IBM and waiting for over 48 hours for a response, started to look around. Using a tcpdump it appeared to have something to do with caa_cfg not listening properly.

Doing some googling, and was able to find this URL.

Once the relevant sub-systems were enabled, the system could add the node. However, you first need to remove the node with:

cluster -rmnode -clustername test -hostname testvm1.example.com

AIX client migrate system to SSP (Shared Storage Pool)

Recently I provided an article on configuring SSP (Shared Storage Pool) on the VIOS.  In this article, we’re going to take an active LPAR (VIOC) and have all of the PVs migrated over to use SSP.  This will allow us to do live partition mobility from one VIOS to another.  In this case here, the cluster has already been created and it’s across 3 VIOS Nodes.

First, on the VIOS we’ll need to determine what VSCSI devices are in use, and how many you can currently have as a maximum. The LPAR name in this example is “dev3”.


$ lshwres -r virtualio --rsubtype slot --level slot |grep dev3
slot_num=0,lpar_name=dev3,lpar_id=2,config=serial,state=1,drc_name=U7778.23X.06ABCDA-V2-C0
slot_num=1,lpar_name=dev3,lpar_id=2,config=serial,state=1,drc_name=U7778.23X.06ABCDA-V2-C1
slot_num=2,lpar_name=dev3,lpar_id=2,config=scsi,state=1,drc_name=U7778.23X.06ABCDA-V2-C2
slot_num=3,lpar_name=dev3,lpar_id=2,config=reserved,state=0,drc_name=U7778.23X.06ABCDA-V2-C3
slot_num=4,lpar_name=dev3,lpar_id=2,config=eth,state=1,drc_name=U7778.23X.06ABCDA-V2-C4

$ lshwres -r virtualio --rsubtype slot --level lpar | grep dev3
lpar_name=dev3,lpar_id=2,curr_max_virtual_slots=10,pend_max_virtual_slots=10

Ok, the LPAR “dev3” is currently configured to have a maximum of 10 virtual scsi devices. The system in question has 4 PVs that we want to add. The idea is to add a one-to-one ratio for performance gains. Thus, we can put one of the disks in the already existant (and currently used) vscsi slot, and then we’ll add three additional ones. As the last one above has a SLOT #4, we’ll add slots 5-7.


chhwres -r virtualio --rsubtype scsi -p dev3 -o a -s 5
/usr/ios/lpm/sbin/lpmdrmgr drmgr -c slot -s 'U7778.23X.06ABCDA-V1-C20' -a
U7778.23X.06ABCDA-V1-C20
U7778.23X.06ABCDA-V2-C5
$ chhwres -r virtualio --rsubtype scsi -p dev3 -o a -s 6
/usr/ios/lpm/sbin/lpmdrmgr drmgr -c slot -s 'U7778.23X.06ABCDA-V1-C21' -a
U7778.23X.06ABCDA-V1-C21
U7778.23X.06ABCDA-V2-C6

$ chhwres -r virtualio --rsubtype scsi -p dev3 -o a -s 7
/usr/ios/lpm/sbin/lpmdrmgr drmgr -c slot -s 'U7778.23X.06ABCDA-V1-C22' -a
U7778.23X.06ABCDA-V1-C22
U7778.23X.06ABCDA-V2-C7

Confirm they were created with:

$ lsmap -all |grep 0x00000002
vhost0 U7778.23X.06ABCDA-V1-C15 0x00000002
vhost3 U7778.23X.06ABCDA-V1-C20 0x00000002
vhost4 U7778.23X.06ABCDA-V1-C21 0x00000002
vhost7 U7778.23X.06ABCDA-V1-C22 0x00000002

I searched for LPAR id #2. This may need to be updated, depending on the ID # in your specific case.

Next, let’s create the LUs (Logical Units) as backing devices. These will be used as the PVs on the system. We’ll also have them created to match the vhost’s above (Virtual SCSI Adapters).


$ lu -create -clustername omega -sp omega -lu dev3_rootvg -size 25G -vadapter vhost0
Lu Name:dev3_rootvg
Lu Udid:fa9eb775c2d8511c32ffff95e6576ce5
Assigning logical unit 'dev3_rootvg' as a backing device.
VTD:vtscsi1

$ lu -create -clustername omega -sp omega -lu dev3_d1 -size 24G -vadapter vhost3
Lu Name:dev3_d1
Lu Udid:c7303b2ab21789026021c895a89f8947
Assigning logical unit 'dev3_d1' as a backing device.
VTD:vtscsi2

$ lu -create -clustername omega -sp omega -lu dev3_d2 -size 24G -vadapter vhost4
Lu Name:dev3_d2
Lu Udid:9fa396afc76dedc4c2e7e44004ebcb41
Assigning logical unit 'dev3_d2' as a backing device.
VTD:vtscsi3

$ lu -create -clustername omega -sp omega -lu dev3_d3 -size 24G -vadapter vhost7
Lu Name:dev3_d3
Lu Udid:b50b5454c02ef012a87dc6e19b8d897e
Assigning logical unit 'dev3_d3' as a backing device.
VTD:vtscsi4

On the VIOC, we’ll look at the existing (relevant) resources, and then scan the bus for our new additions.


dev3:~# lsdev |grep vscsi
vscsi0 Available Virtual SCSI Client Adapter
dev3:~# lspv
hdisk0 0009cbaac48a8574 rootvg active
hdisk1 0009cbaac4c2e4a9 othervg active
hdisk2 0009cbaac4c2e4ee othervg active
hdisk5 0009cbaac4c2e534 othervg active


dev3:~# cfgmgr
dev3:~# lspv
hdisk0 0009cbaac48a8574 rootvg active
hdisk1 0009cbaac4c2e4a9 othervg active
hdisk2 0009cbaac4c2e4ee othervg active
hdisk5 0009cbaac4c2e534 othervg active
hdisk3 none None
hdisk4 none None
hdisk6 none None
hdisk7 none None
dev3:~# lsdev |grep vscsi
vscsi0 Available Virtual SCSI Client Adapter
vscsi1 Available Virtual SCSI Client Adapter
vscsi2 Available Virtual SCSI Client Adapter
vscsi3 Available Virtual SCSI Client Adapter

Update some disk attributes:

dev3:~# for i in 3 4 6 7 ; do chdev -l hdisk${i} -a hcheck_interval=30 -a queue_depth=32 ; done
hdisk3 changed
hdisk4 changed
hdisk6 changed
hdisk7 changed

Migrate rootvg


dev3:~# migratepv hdisk0 hdisk3
0516-1011 migratepv: Logical volume hd5 is labeled as a boot logical volume.
0516-1246 migratepv: If hd5 is the boot logical volume, please run 'chpv -c hdisk0'
as root user to clear the boot record and avoid a potential boot
off an old boot image that may reside on the disk from which this
logical volume is moved/removed.
migratepv: boot logical volume hd5 migrated. Please remember to run
bosboot, specifying /dev/hdisk3 as the target physical boot device.
Also, run bootlist command to modify bootlist to include /dev/hdisk3.
dev3:~# chpv -c hdisk0
dev3:~# bosboot -ad /dev/hdisk3

bosboot: Boot image is 51228 512 byte blocks.
dev3:~# bootlist -m normal hdisk3
dev3:~# bootlist -m normal -o
hdisk3 blv=hd5 pathid=0

Confirmation:
dev3:~# ls -l /dev/rhdisk3 /dev/ipldevice
crw------- 2 root system 13, 5 Sep 30 11:43 /dev/ipldevice
crw------- 2 root system 13, 5 Sep 30 11:43 /dev/rhdisk3
dev3:~# ls -l /dev/rhd5 /dev/ipl_blv
crw-rw---- 2 root system 10, 1 May 27 11:18 /dev/ipl_blv
crw-rw---- 2 root system 10, 1 May 27 11:18 /dev/rhd5

dev3:~# lsvg -p rootvg
rootvg:
PV_NAME PV STATE TOTAL PPs FREE PPs FREE DISTRIBUTION
hdisk0 active 800 800 160..160..160..160..160
hdisk3 active 799 102 17..13..00..00..72

migratePVs for othervg

dev3:~# extendvg oravg hdisk4 hdisk6 hdisk7
0516-1254 extendvg: Changing the PVID in the ODM.
dev3:~# migratepv hdisk1 hdisk4 hdisk6 hdisk7
dev3:~# migratepv hdisk2 hdisk4 hdisk6 hdisk7
dev3:~# migratepv hdisk5 hdisk4 hdisk6 hdisk7

Get EMC VPD information on old PVs

Get the VPD information, then when you remove the disks they can be re-claimed by the Storage Administrator.

from VIOS:
$ lsmap -vadapter vhost0 ## Your’s may be different vhost adapter… If you don’t know, use lsmap -all instead.

SVSA Physloc Client Partition ID
--------------- -------------------------------------------- ------------------
vhost0 U7778.23X.06ABCDA-V1-C15 0x00000002

VTD vtopt1
Status Available
LUN 0x8500000000000000
Backing device
Physloc
Mirrored N/A

VTD vtscsi1
Status Available
LUN 0x8600000000000000
Backing device dev3_rootvg.fa9eb775c2d8511c32ffff95e6576ce5
Physloc
Mirrored N/A

VTD vtscsi44
Status Available
LUN 0x8100000000000000
Backing device hdisk91
Physloc U78A5.001.WIH8668-P1-C12-T2-W500009720849B924-L2E000000000000
Mirrored false

VTD vtscsi45
Status Available
LUN 0x8200000000000000
Backing device hdisk92
Physloc U78A5.001.WIH8668-P1-C12-T2-W500009720849B924-L2F000000000000
Mirrored false

VTD vtscsi46
Status Available
LUN 0x8300000000000000
Backing device hdisk93
Physloc U78A5.001.WIH8668-P1-C12-T2-W500009720849B924-L30000000000000
Mirrored false

VTD vtscsi47
Status Available
LUN 0x8400000000000000
Backing device hdisk94
Physloc U78A5.001.WIH8668-P1-C12-T2-W500009720849B924-L31000000000000
Mirrored false

In the case above, the PVs which will be removed and reclaimed by the Storage Administrator will be hdisk91 – hdisk94.

= Proper removal of PVs from VIOC =

Note: It would be advisable to “reboot” the LPAR/VIOC first to ensure it will come back up properly. Assuming it does, now you can proceed with removing the old storage and providing the EMC VPD to the storage admin for reclaiming. In the case of AIX, the EMC VPD will be empty (or contain useless data) if you haven’t previously installed the AIX_ODM_Definitions from EMC.


dev3:~# reducevg rootvg hdisk0
dev3:~# reducevg othervg hdisk1
dev3:~# reducevg othervg hdisk2
dev3:~# reducevg othervg hdisk5


dev3:~# for i in hdisk0 hdisk1 hdisk2 hdisk5; do rmdev -dl $i ; done
hdisk0 deleted
hdisk1 deleted
hdisk2 deleted
hdisk5 deleted

OK, disks have been removed from the VG and deleted from the VIOC. Now you need to remove them from the VIOS.

= Remove PVs from the VIOS =

The PVs have been removed from the client LPAR (vioc) so they virtual mappings will need to be removed. As you got the VPD’s early, run these commands in the restricted shell.


$ rmvdev -vtd vtscsi44
$ rmvdev -vtd vtscsi45
$ rmvdev -vtd vtscsi46
$ rmvdev -vtd vtscsi47

Next get the EMC VPD information (for providing to storage admin). This part could be done outside the restricted shell if dealing with multiple PVs.


dev3:~# for i in {91..94} ; do lscfg -vpl hdisk${i} |grep VPD ; done
LIC Node VPD................0C43
LIC Node VPD................0C44
LIC Node VPD................0C45
LIC Node VPD................0C46

Clear the PVID from the disks with:
dev3:~# for i in {91..94} ; do chdev -l hdisk${i} -a pv=clear ; done

Now delete the PVs with:

dev3:~# for i in {91..94} ; do rmdev -dl hdisk${i} ; done
hdisk91 deleted
hdisk92 deleted
hdisk93 deleted
hdisk94 deleted

Congratulations. You have migrated all of the LUNs over to SSP devices. You can now use the IVM web interface to “migrate” the system from one VIOS to another.

AIX and sparse files

Tags

, , , , , ,

Recently I had to copy around 13GB of data from one system over to another. However, after copying the files across and running a du on the file folder it was quite different in size. The target folder was showing as being over 16GB for the same data.

Delving further into the file structure coupled with using du, it was noted that some files were the same with ls but different with du. Sparse files was the culprit which can be determine by running “fileplace ” on a suspected file. If in fact it’s a sparse file, you’ll notice the difference.

For a clear definition of sparse files, and how to get around the issue, take a look here.  The issue seems to be that AIX tar can’t handle sparse files… However, GNU tar can.  So the remedy would be to replace AIX tar with GNU tar.  This article explains how to replace AIX’s tar with the GNU tar.

Once that is done, you should be able to create your tarball with utilizing the sparse option (-S).  So for example:

# ( tar -Scf - ./ ) | ( ssh testbox 'cd /home/testuser/html && tar -Sxvpf -' )


Adding Shared Storage pool to VIOS

Tags

, , , , , , ,

Pre-Requisites:

* Vios version 2.2.0.11 SP6+
* FQDN on the VIOS servers
* no virtual optical devices (remove prior to migrating)
* FQDN & short name in /etc/hosts
* update /etc/netsvc.conf to have hosts=local,bind so that local is checked prior to DNS
* same vlan ID on all of the VIOS machines (this is accessible in the IVM, Shared Virtual Ethernet, Ethernet Bridge)
* SAN LUNs assigned to multiple VIOS’s

Recently with PowerVM (VIOS) IBM has added the ability to use shared storage pools (as of vios 2.2.0.11 SP6). This now gives one the ability to setup shared storage to 2 or more VIOS’s which enabled live partition mobility (move a partition while system live, with no impact to production, and alleviating the need for an outage window).

To configure this, one will need the SAN Administrator to assign the shared storage to two or more VIOS. Once that is done, we’ll scan for the new devices on the VIOS, and configure ’em.

VIOS 1

Perform a cfgmgr to find the storage. If you already have quite a few disks, you may wish to run something like this instead:
lspv > /tmp/lspv.1 ; cfgmgr ; lspv > /tmp/lspv.2 ; diff /tmp/lspv.1 /tmp/lspv.2 | grep hdisk

Once the disks are added in, you may need to configure some specific disk attributes. In my case, I make the following changes to each of the newly discovered disks:

chdev -l hdiskX -a algorithm=round_robin -a reserve_policy=no_reserve

Now as these disks will be used for shared storage, it would be wise to rename them so one doesn’t attempt to re-purpose them causing you grief. Example:

rendev -l hdisk1 -n repo1
rendev -l hdisk2 -n shared01
rendev -l hdisk3 -n shared02

Note: When allocated LUNs to the VIOS for shared storage, one disk is used as the repository. The other disks are clustered storage. One might think that’s a single point of failure, however, the repository information is storage in multiple locations, so rebuilding the repository disk is typically a non-issue.

Assuming the disks assigned to your weren’t repuposed, you can validate they are available for use with:
$ lspv -free

If the newly added disks are not showing up, then changes are they have previously stored LVM information residing withing the VGDA. A quick way to check this is with the command: readvgda | more

If you do in fact have previous VGDA information residing on the physical volume, validate it isn’t in use somewhere else. Assuming it is not used, you can clear the VGDA with: chpv -C

Now, let’s move on to creating the shared storage pool with a command like:

cluster -create -clustername test -repopvs repo1 -spname testpool -sppvs shared01 shared02 -hostname vios1.company.x.com

After a short wait, the cluster should be created. Verify with:

cluster -list
CLUSTER_NAME: test
CLUSTER_ID: ea2ca9923b6c11e5832d00892a1j664ab


$ cluster -status -clustername test
Cluster Name State
test OK

Node Name MTM Partition Num State Pool State
vios1 xxxx-xxXyyyyyyyy 1 OK OK

(first group of X's are the Model, second set are machine type. All the y's are the serial number of the unit)

Next, you will create a backing device with a command like:

mkbdsp -clustername test -sp testpool 25G -bd migtest
Lu Name:migtest
Lu Udid:906a06330f107ba83892366bce76a33b

The next is to assign this backing device (virtual disk) to an LPAR. You’ll need an LPAR for this part, so if you don’t have one.. go create one now.

Assign virtual disk to the LPAR

$ mkbdsp -clustername test -sp testpool -bd migtest -vadapter vhost0 -tn migtest_rootvg
Assigning logical unit 'migtest' as a backing device.

VTD:migtest_rootvg

Now it would just be a matter of installing an OS on that disk however you see fit. If you’re using a disk image from the VIOS repository, just create the virtual optical device and assign away. Assuming this is a new VIOS, you can create the virtual repository like so:


$ lssp
Pool Size(mb) Free(mb) Alloc Size(mb) BDs Type
rootvg 76800 27968 64 0 LVPOOL

This shows you have over 20GB of free space, so for this example we’ll create a 15GB virtual repository.
mkrep -sp rootvg -size 15G

Next, you would upload an AIX DVD disk image file to vio1:/var/vio/VMLibrary. You may need to chown padmin /var/vio/VMLibrary first.

List your repository with: lsvopt and see the available disk image files with: lsrep.

Now, you may need to create a new virtual optical disk to install the OS. This is done using a command similar to:

mkvdev -fbo -vadapter vhost0 -dev testDVD

Substitue vhost0 for your virtualServerAdapter. The -dev gives it a name of your choosing. If you omit -dev testDVD, the VIOS will assign it’s own name for the virtual optical device.

Now that is done, you will want to assign the virtual disk you created earlier to this lpar. For this example, I’ll assume the partition name is migtest, and that it has a partition id of 20 (represented by 0x14 below).


$ lsmap -all
SVSA Physloc Client
Partition ID
--------------- -------------------------------------------- ------------------
vhost0 Uxxx.xxX.yyyyyyy-V1-C11 0x00000014

So assign it with:
mkbdsp -clustername test -sp testpool -bd migtest -vadapter vhost0 -tn migtest_rootvg

This is then viewable with the command: lsmap -all or specifically for a certain virtual server adapter: lsmap -vadapter vhost0

Now feel free to assign a disk to the LPAR, boot it, and install the OS (or do a nim restore, whatever).

Assign disk to VTD:
loadopt -disk -vtd

At the moment, you have created a single-node shared storage pool. Run the following command to add in another vios node:
cluster -addnode -clustername test -hostname vios2

Now that both VIOS nodes are configured, you should be able to do the migration from one to the other.
One would do the migration from within the Vio (the Web page for managing the VIO).

Note: You should be aware of a couple of findings.

1) In the event that your VIO server(s) are at different IOS levels, you should create the cluster on the “oldest ios level”. Otherwise, you won’t be able to join that node to the cluster.
2) Only the padmin user has the ability to create a Logical Unit (LU) of a 1GB disk or more. This would be by design, and would probably require editing perms for RBAC for another user
3) Each VIOS which is a member of the cluster, can ONLY be a member of one cluster (you can’t have multiple clusters on a VIO server)

Some additional commands that could be useful.

To add a disk to an existing cluster.
chsp -add -clustername testpool -sp testpool hdisk54

To remove a disk from an existing cluster.
pv -remove -clustername testpool -sp testpool -pv hdisk54

windows filezilla and sftp keys

When connecting from a Windows client to a NIX server via ssh / sftp / scp, the usage of ssh keys would come in handy.  The generation of a ssh keypair, will cause two keys to be generated.  One private key, and one public key.  The private key stays with you / your machine, and the public key is placed on the various NIX servers you connect to.

In the case of windows, one can download puttygen (available from Putty Download Page).  You can use this tool to generate an openssh keypair, and use it with putty and/or filezilla.  For the purpose of this tutorial. we’ll use it with filezilla.

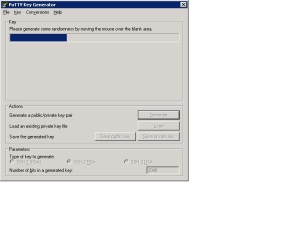
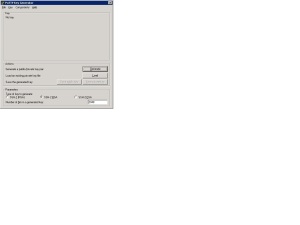
Next, open puttygen.exe.  You’ll have an option to generate a keypair, or to load a keypair.  For generating a keypair, you’ll notice you have three types of keys to choose from (see figure 1.0 below).  SSH-1, SSH-2 RSA or SSH-2 DSA.  You will NOT want ssh version 1, as it has security issues with it’s usage and usually is NOT accepted on alot of servers.  The choice between RSA and DSA is quite the debate in itself as to which is better.  Once selected (or using the default) click the generate button.

Figure 1.0
puttygen main screen

puttygen_main_screen


Figure 1.1
Puttygen – Generation of ssh key pair

puttygen_generating_key


Figure 1.2
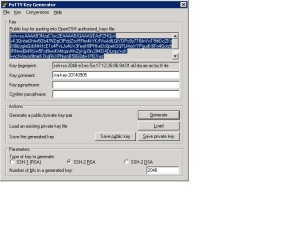
Puttygen – Completion of generated SSH key

puttygen_completed_key_generation


Using the highlighted text above, you can copy and paste that into the file suggested, or click the save public key button.  Typically, on a NIX server you create a hidden directory (.ssh) and paste the file contents into a file named authorized_keys.  This will allow you to ssh  / sftp into the server using your key, and the password of the site is irrelevant.  This will get around the problem of expired keys.  Typically before clicking “Save private key” you would enter a passphrase to secure your private key.  However, as of FileZilla 3.5.3, this feature is not implemented.  The private key should be saved to your hard drive.  Every time you connect to the NIX server using your public key, it will validate against your private key.  Thus, it should be in a location which is easily accessible when making a connection to the server.


KEY ISSUES:

The puttygen.exe tool generates the keypair in windows SSH format, which is different than openssh.


FileZilla


Restoring the PVID from an accidently wiped physical volume

Tags

, , , ,

Recently some disks had their PVIDs wiped accidentally. If you have the original PVIDs, they can be restored without too much trouble (and averting a restoration process).

The steps for a VIOS/VIOC compared to an AIX system are similar. In the case of a VIOS, there are a couple more steps involved.

To replace the PVID, run a command like:
Step 1: (put PVID into a text file)
perl -e 'print pack("H*","0123456789abcdef");' > /tmp/pvid

replace the 0123456789abcdef with the old PVID you wish to restore.

Step 2: (write PVID to the physical device)
cat /tmp/pvid | dd of=/dev/hdiskX bs=1 seek=128

Replace hdiskX with the actual physical device you are attempting to fix. Assuming it works, you should get output from dd indicating 8 records in, and 8 records out.

Note: If you get an I/O error when attempting the dd operation, you may be hitting a size issue. I recently hit this… Check the size of the device with: bootinfo -s hdiskX. If the size of the disk = 0, that is your problem. You won’t be able to write anything to a 0 byte device. Simply do a rmdev -dl hdiskX and then rescan the bus with: cfgmgr. It should detect the disk at the right size (verifiable with: bootinfo -s hdiskX) and then the dd operation should complete properly.

Once the dd has written the records properly, remove the device and rescan: rmdev -dl hdiskX && cfgmgr

You should now have the proper PVID back.

In the case of a VIOS, you may NOT be able to write to the PV if it has virtual mappings. So, you’ll want to unmap the virtual disk(s) from the VIOC (and rmdev the devices), make the above changes, and then re-create your virtual mappings to the VIOC.

Perl giving out of memory errors when installing a package

Tags

, ,

Noticed the other day that CPAN was out of date. When attempting to update it with:
cpan install Bundle::CPAN it errors out with an “out of memory” message.

This is typically caused on AIX because of hitting a ulimit. If you run ulimit -a it should show you the current settings. Try setting the memory settings to unlimited with:

ulimit -m unlimited
ulimit -d unlimited

Worked like a charm in my case.

Work around for build date pre-requisite failures

Tags

Came across an issue recently when attempting to update AIX 7.1 TL2 SP4 to the newer level of AIX 7.1 TL3 SP4. I loopmounted the ISO (as it was already on the system) and attempted to do an:
smit update_all without any success.

Exact error was:

0503-465 installp: The build date requisite check failed for fileset devices.pciex.df1028e214103c04.diag.
Installed fileset build date of 1341 is more recent than the selected fileset build date of 1241.

Before going any further, you should be aware of the build date option and why it is relevant. Here is an example:
AIX 7100-03-04-1441.

Break-down of that is:
AIX – Operating system of course
7100 – Base level, this one would mean 7.1
03 – ML / TL (Technology Level)
04 – SP (Service Pack)
1441 – Build date (YYWW), which is the 2 digit year and the week # for the release

Now typically, when one attempts to install a newer TL / SP, the AIX system will check to see if you are attempting to install an older level that what is already there.

For example, you may have AIX 7100-03-05 installed, and you attempt to install AIX 7100-04-00. The release date for 7100-03-05 is newer than 7100-04-00. As you don’t want to ‘regress’ your already installed packages, the installer will quit with a similar error to above.

Typically to get around this problem, you would:

1) install a newer AIX TL / SP level (newer build date)
2) work with IBM to get a specialized .toc file built

In my case, as it’s a test system anyways, I done a simple work-around.

1) mount the ISO, then copied the contents from installp/ppc into another directory (assume /update for this test for simplicity)
2) cd /update
3) rm .toc # Remove the hidden table of contents file
4) inutoc . ## Generate a new table of contents file
5) sed ‘s/BUILDDATE 1241/BUILDDATE 1441/g’ .toc > .newtoc
6) mv .toc .oldtoc && mv .newtoc .toc
7) perform upgrade with: smit update_all

Worked flawlessly in my case.